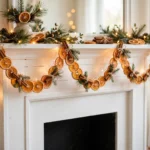

There is something quietly magical about a garland you made yourself. It does not need to be perfect — in fact, the slightly uneven edges and the handmade touches are exactly what make it charming. A handmade garland smells wonderful, costs very little, and turns an ordinary afternoon into one of those slow, cozy Christmas memories that the whole family remembers.
This guide shows you four garlands you can make at home: classic dried orange slices, a cheerful popcorn and cranberry garland, a paper star and snowflake garland, and a soft velvet bow garland. Each one uses simple materials you probably already have, each one suits a different room, and together they can dress a whole house for Christmas.
Choosing the Right Garland for Each Room
Not every garland belongs everywhere, and choosing the right one for the room makes all the difference. Dried orange slices look beautiful on a mantel or a staircase, where their warm amber glow catches the light. Popcorn and cranberry garland belongs on the tree, where its old-fashioned charm feels right at home among the ornaments. Paper stars and snowflakes are perfect for a child’s bedroom or a window, where they can catch the light and spin gently.
Think about how long each garland needs to last, too. Dried orange slices and paper stars keep beautifully for weeks and can be stored and reused next year. Popcorn garland is the short-lived one: it looks wonderful on the tree for the season, but it is best composted once the holidays are over.
Materials You Will Need
- Fresh oranges, firm and unblemished, for drying
- A sharp knife, a cutting board, and oven mitts
- Baking sheets lined with parchment paper
- Popcorn kernels, popped plain with no butter or salt, and fresh cranberries
- A long needle and strong thread or twine
- White and cream paper, scissors, and a pencil
- A hole punch and string for the paper garland
- Velvet ribbon in deep red, forest green, or burgundy, about two inches wide
- Floral wire and small scissors for the velvet bows
- A sturdy step stool and removable adhesive hooks
Project 1: Classic Dried Orange Slice Garland
1. Slice the oranges thin and even
Choose firm, unblemished oranges and slice them crosswise into thin, even rounds, about a quarter of an inch thick. Even slices dry at the same rate, so take your time with the knife and keep your fingers well clear of the blade.
2. Dry them low and slow in the oven
Lay the orange slices in a single layer on baking sheets lined with parchment paper, leaving a little space between each one. Dry them in a low oven at 200 degrees Fahrenheit, turning them over once halfway through, until they are dry to the touch and slightly translucent — this usually takes two to three hours.
3. Cool, string, and hang the garland
Take the baking sheets out of the oven with oven mitts and let the orange slices cool completely before you handle them. Thread a long needle with strong twine, pass it through the top edge of each slice, and hang the finished garland across a mantel or a window with removable adhesive hooks.
Project 2: Popcorn and Cranberry Garland
1. Pop the popcorn plain
Pop a big batch of popcorn with no butter, no salt, and no flavoring — plain popcorn is lighter, drier, and much easier to thread, and it keeps its shape better on the string. Let it cool completely, then pick out the unpopped kernels and any burnt pieces.
2. Thread the popcorn and cranberries
Thread a long needle with strong thread and alternate the pieces: a few pieces of popcorn, then a cranberry, then a few more pieces of popcorn. The red cranberries against the white popcorn are the classic Christmas look, and the steady rhythm keeps the garland even and pretty.
3. Hang it on the tree and enjoy it fresh
Drape the garland in gentle swags between the branches, where the white and red pop against the green. Keep it away from pets and out of damp rooms. When the season is over, compost the garland rather than storing it — it has about a two-week indoor life at its best, and it is meant to be enjoyed fresh.
Project 3: Paper Star and Snowflake Garland
1. Fold and cut the stars and snowflakes
Fold squares of white and cream paper into triangles, then cut small shapes out of the folded edges — little triangles, curves, and notches — to make stars and snowflakes. Open each one carefully and press it flat under a book for a few minutes. No two snowflakes will be alike, and that is the charm.
2. Punch a hole and thread the string
Punch a small hole near the top of each star and snowflake, then thread them onto a long piece of string, spacing them a few inches apart. Alternate stars and snowflakes, and mix white and cream papers for a soft, layered look.
3. Hang it where it catches the light
Paper garlands look best where the light can shine through them — across a window, along a bedroom wall, or above a child’s bed. Use removable adhesive hooks to hang the ends and let the middle drape gently. In the afternoon sun the paper stars glow softly, and on a breezy day they turn in the lightest draft.
Project 4: Velvet Bow Garland
1. Cut the velvet ribbon into lengths
Cut the velvet ribbon into lengths of about twelve inches each, one for every bow in your garland. Velvet ribbon in deep red, forest green, or burgundy looks richest against winter greenery, and the soft pile of the velvet catches the light in a way that flat ribbon never does.
2. Tie each bow by hand
Tie each length of ribbon into a simple bow, pulling the loops even and fluffing them with your fingers until the bow looks full and soft. A bow tied by hand always looks better than a stiff, perfect one: the slight unevenness is what makes it look handmade and warm.
3. Attach the bows and store them carefully
Thread the bows onto a length of twine or wire, or wire each bow directly onto an existing greenery garland, spacing them evenly along its length. A few bows spaced along a plain cedar garland transform it completely.
Safety Notes
Use oven mitts when handling hot baking sheets, and keep your fingers well clear of the blade when slicing oranges — a sharp knife and a steady cutting board make the job safer, not more dangerous. Keep popcorn garland away from pets, and remember it has about a two-week indoor life at its best, so enjoy it fresh and compost it when the season ends.
Frequently Asked Questions
How long do dried orange slices take to make?
Dried orange slices take two to three hours in a low oven at 200 degrees Fahrenheit, turned once halfway through, until they are dry to the touch and slightly translucent. Slice them thin and evenly, and let them cool completely before stringing.
How long does popcorn garland last?
Popcorn garland looks its best for about two weeks indoors. Keep it away from pets and out of damp rooms, and compost it when the season ends rather than storing it.
Can I make garlands with children?
Yes, the popcorn and cranberry garland and the paper star garland are both wonderful projects for children. Threading popcorn is easy and forgiving, and cutting paper snowflakes is a classic family activity. Give children blunt-tipped scissors, and keep sharp knives and hot ovens for the grown-ups.
What is the best garland for a mantel?
Dried orange slices look beautiful on a mantel, where their warm amber glow catches the light, and a velvet bow garland wired onto a cedar garland transforms a plain mantel into something luxurious. Both keep well for weeks and can be reused next year.
How do I hang a garland without nails?
Removable adhesive hooks are the easiest renter-friendly option: choose hooks rated for the weight of your garland, press them onto a clean, dry surface, and wait a little while before hanging anything from them. Use a sturdy step stool, and never stand on a chair.
A handmade garland is never just decoration — it is an afternoon well spent, a kitchen that smells like Christmas, and a home that feels truly yours. Make one this weekend, hang it with care, and let it glow all season long.